Test, build and package Docker for ARM the official way
Fri, Feb 5, 2016With the recent release of Docker 1.10.0 it is a good time to talk about Docker on ARM. As many of you know our mission is to make Docker (and container technology) a first class citizen on ARM devices.
With Docker 1.10.0 it is finally possible to build Docker for ARM from the offical Docker repository.
Mind you - not everything that works for x86 is possible for ARM yet, but quite a lot is already working today. And it is a first important step towards offical support for Docker on ARM.
In this blog post I am going to walk you through all the steps that are needed to test, build and package Docker on ARM. And as an extra bonus I am showing you how to do this on the most advanced ARM on-demand cloud-platform ever.
Preparation: First we need suiteable ARM hardware
Our friends at Scaleway make it really easy and cheap to get your hands on powerful ARM hardware with their ARM on-demand cloud platform. Using an ARM server costs only 0,006 € per hour and you only pay when a server is actually running.
So what are you waiting for? Sign up for an account now! :)
After the registration the next step is to create a new server. When creating a new server we need to choose an image. An image is the combination of an operating system and some preinstalled software. There are dozens of different images at the Scaleway ImageHub to choose from. And one is of special interest to us - the Docker image. It combines an Ubuntu 15.10 operating system with a Docker 1.9.1 installation.
Why do we need a Docker installation anyways? Well, because most of the stuff you can do with the Docker repository needs an already running Docker. Using the Scaleway Docker image is just a reliable and fast way to get us started.
OK. Let’s actually create the server. This can either be done via Web-GUI or via commandline.
In the Web-GUI just select the “Server” menu entry on the left and click the “Create”-button.
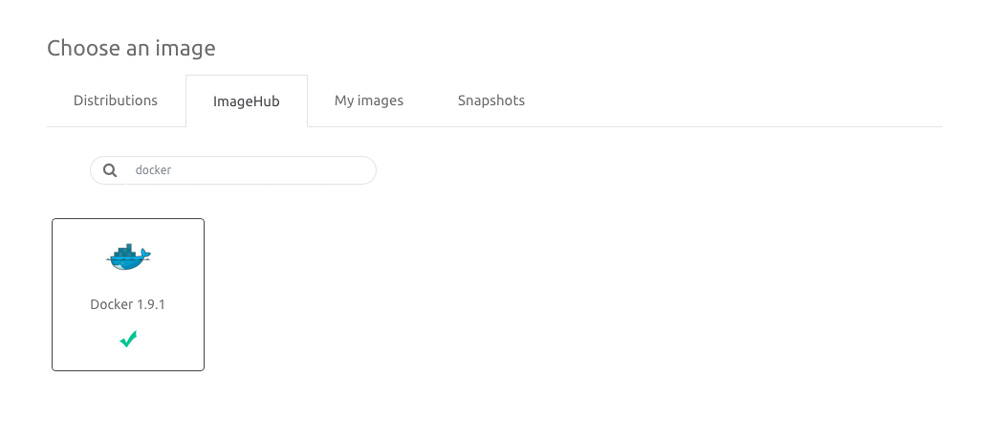
In the following dialogue choose the “Image Hub” tab and search for “docker”.
Select the “Docker 1.9.1” image and you are good.
The same can be done with the Scaleway Command Line Interface, too. Download the latest version for your operating system from the release page.
For Mac user the easiest way to install it, is via Homebrew.
$ brew install scw
==> Downloading https://homebrew.bintray.com/bottles/scw-1.7.1.mavericks.bottle.tar.gz
Already downloaded: /Library/Caches/Homebrew/scw-1.7.1.mavericks.bottle.tar.gz
==> Pouring scw-1.7.1.mavericks.bottle.tar.gz
==> Caveats
Bash completion has been installed to:
  /usr/local/etc/bash_completion.d

zsh completion has been installed to:
  /usr/local/share/zsh/site-functions
==> Summary
🍺  /usr/local/Cellar/scw/1.7.1: 4 files, 10.7
Check if the Scaleway CLI works with
$ scw --version
scw version v1.7.1, build homebrew
Looks good.
To be able to do anything meaningful with the CLI we need first to log into our account. Use the email and password you got when you registered as credentials for your Scaleway account.
$ scw login
Login (cloud.scaleway.com): [email protected]
Password:
Do you want to upload an SSH key ?
[0] I don't want to upload a key !
[3] id_rsa.pub
Which [id]:
When you are asked to upload the public part of your SSH key you should do so. This allows us later to securely connect to our Scaleway ARM servers via SSH.
After a successful login we are now able to interact with our Scaleway account remotely.
For instance we can now list all our existing servers.
If you did not create any servers yet you should get an empty list.
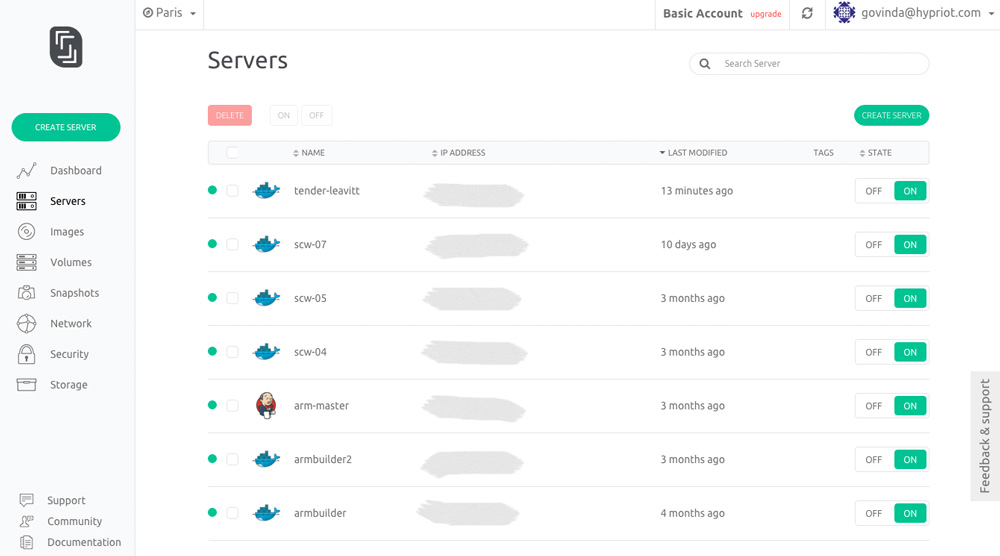
As you can see, I already have a running server:
$ scw ps
SERVER ID           IMAGE               COMMAND             CREATED             STATUS              PORTS               NAME
1b72r8c7            Docker_1_9_0                            9 days              running             163.152.159.113     scw-07
With the next command we will create and log into the created server in one step.
scw exec $(scw start --wait $(scw create docker_1_9_1)) /bin/bash
root@tender-leavitt:~#
Please be patient here as the allocation of a new server can take some time.
Basically we combined a couple of scw commands into one: First we scw create a new server, then we scw start it and afterwards we log into it via scw exec.
You can further explore what you can do with the CLI via scw help.
Once logged into the server we are dropped to the command line:
root@tender-leavitt:~#
As you can see this is just a standard Ubuntu 15.10 operating system:
root@tender-leavitt:~# uname -a
Linux tender-leavitt 4.3.3-docker-1 #1 SMP Wed Jan 20 13:31:30 UTC 2016 armv7l armv7l armv7l GNU/Linux
root@tender-leavitt:~# lsb_release -a
No LSB modules are available.
Distributor ID: Ubuntu
Description:  Ubuntu 15.10
Release:  15.10
Codename: wily
Did you notice the last part of the uname output? It shows that we have a armv7l hardware platform.
This is the hard evidence that we are truely working on ARM hardware and Scaleway is not cheating us. :)
The last thing we need to check is if we really have a working Docker installation:
# dpkg -l | grep docker
ii  docker-hypriot                   1.9.1-1                         armhf        Docker for ARM devices, compiled and packaged by http://blog.hypriot.com
Well, this aleady looks promising. Seems we also do have a Hypriot Docker running here, too. Nice. :)
Let’s check out some more details:
# docker version
Client:
 Version:      1.9.1
 API version:  1.21
 Go version:   go1.4.3
 Git commit:   a34a1d5
 Built:        Fri Nov 20 23:03:02 UTC 2015
 OS/Arch:      linux/arm

Server:
 Version:      1.9.1
 API version:  1.21
 Go version:   go1.4.3
 Git commit:   a34a1d5
 Built:        Fri Nov 20 23:03:02 UTC 2015
 OS/Arch:      linux/arm
Seems, we now have everthing ready for the second part of this blog post.
Test, build and package Docker for ARM
Congrats, you already finished the difficult part!
Which means we can now get on to the easy part of testing, building and packing Docker.
Sounds to good to be true?
Let’s see.
First we need to clone the Docker repository:
# git clone https://github.com/docker/docker.git
Cloning into 'docker'...
remote: Counting objects: 135534, done.
remote: Compressing objects: 100% (11/11), done.
remote: Total 135534 (delta 7), reused 3 (delta 3), pack-reused 135520
Receiving objects: 100% (135534/135534), 79.57 MiB | 1.61 MiB/s, done.
Resolving deltas: 100% (90280/90280), done.
Checking connectivity... done.
Afterwards for all the following steps we need to change into the cloned repository:
# cd docker
The Docker team uses a dedicated Docker image (how could it be otherwise) as a base for all development work.
It is based on the Dockerfile that you will find in the root directory of the Docker repository.
With Docker 1.10.0 you will find that there is another Dockerfile present… one with an .armhf extension.
This one is used to build an ARM compatible Docker development image.
Building the Docker development image
Creating the Docker development image can take a long time as lots of software gets downloaded, compiled and installed. The good news is that this is usually only needed once.
make build
Afterwards we can check if the image was successfully created:
# docker images
REPOSITORY          TAG                 IMAGE ID            CREATED             VIRTUAL SIZE
docker-dev          master              2ac07dec8c9a        14 minutes ago      931.9 MB
If all went well we should now see an image that is named docker-dev.
With this out of the way we can now proceed to the next step.
Testing Docker
There are two types of tests that we can run: unit-tests and integration-tests. To ensure that a certain Docker version really works we need to ensure that all the tests are passing.
To run the unit-test suite execute
# make test-unit
To run the integration-test suite execute
# make test-integration-cli
Be aware that running the integration tests can take a really long time. We are speaking of hours here. But that time is worth waiting as there are more than 1,100 tests that already work on ARM as well:
OK: 1168 passed, 41 skipped
And if you feel particularly daring you can run all tests together with
# make test
When all tests are green we might as well go to the next step.
Building a new Docker binary
Building a new Docker binary is really fast compared to running the tests.
Just execute
# make binary
This will compile a brand new Docker binary.
At the end of the compilation make binary will give you an output similar to this:
Created binary: bundles/1.11.0-dev/binary/docker-1.11.0-dev
With this information we can try it out at once:
# bundles/1.11.0-dev/binary/docker-1.11.0-dev version
Client:
 Version:      1.11.0-dev
 API version:  1.23
 Go version:   go1.4.3
 Git commit:   18204ea
 Built:        Fri Feb  5 00:48:09 2016
 OS/Arch:      linux/arm
This worked out pretty well, too.
But shipping a plain binary is not very cool, is it? So shall we make a Debian package as well?
Building a Docker Debian package
The command for creating a Debian package is just another make command:
# make deb
This first creates a binary and then puts it into a Debian package.
At the end you gonna find the binary beneath the bundles directory:
# ls -la bundles/latest/build-deb/debian-jessie
total 98708
drwxr-xr-x 2 root root     4096 Feb  5 01:49 .
drwxr-xr-x 3 root root     4096 Feb  5 01:50 ..
-rw-r--r-- 1 root root     1704 Feb  5 01:45 docker-engine_1.11.0~dev~git20160204.213112.0.18204ea-0~jessie_armhf.changes
-rw-r--r-- 1 root root  5405608 Feb  5 01:45 docker-engine_1.11.0~dev~git20160204.213112.0.18204ea-0~jessie_armhf.deb
-rw-r--r-- 1 root root      812 Feb  5 01:39 docker-engine_1.11.0~dev~git20160204.213112.0.18204ea-0~jessie.dsc
-rw-r--r-- 1 root root 95641747 Feb  5 01:39 docker-engine_1.11.0~dev~git20160204.213112.0.18204ea-0~jessie.tar.gz
-rw-r--r-- 1 root root      527 Feb  5 01:25 Dockerfile.build
The resulting package can then be installed with the standard Debian package-management tools.
By the way - all this is a first example for the upcoming Docker multi-architecture support. While Docker ARM support is still only partially there, more is to come soon.
It is just awesome to see what is already possible today! Stay tuned for more!
As always, use the comments below to give us feedback, discuss this post on HackerNews and share this post on Twitter, Google or Facebook.
Govinda @_beagile_
comments powered by Disqus