Microservices Bliss with Docker and Traefik
Tue, Jun 7, 2016A couple of weeks ago I found this really nice and neat HTTP reverse proxy called Traefik. It is meant to act as frontend proxy for microservices that are provided by a dynamic backend like Docker.
Did you realize the important part of the last sentence was dynamic?
What makes Traefik really special is its ability of adding and removing container backend services by listening to Docker events. So whenever a Docker container is started or stopped Traefik knows about it and adds the container to its list of active backend services.

With this ability Traefik can replace much more complicated setups based on Nginx or HAProxy that have to use additional tools like Registrator, Consul and Consul-Template to achieve the same kind of functionality.
So let me show you with a simple microservice example how easy it is to get started with Traefik…
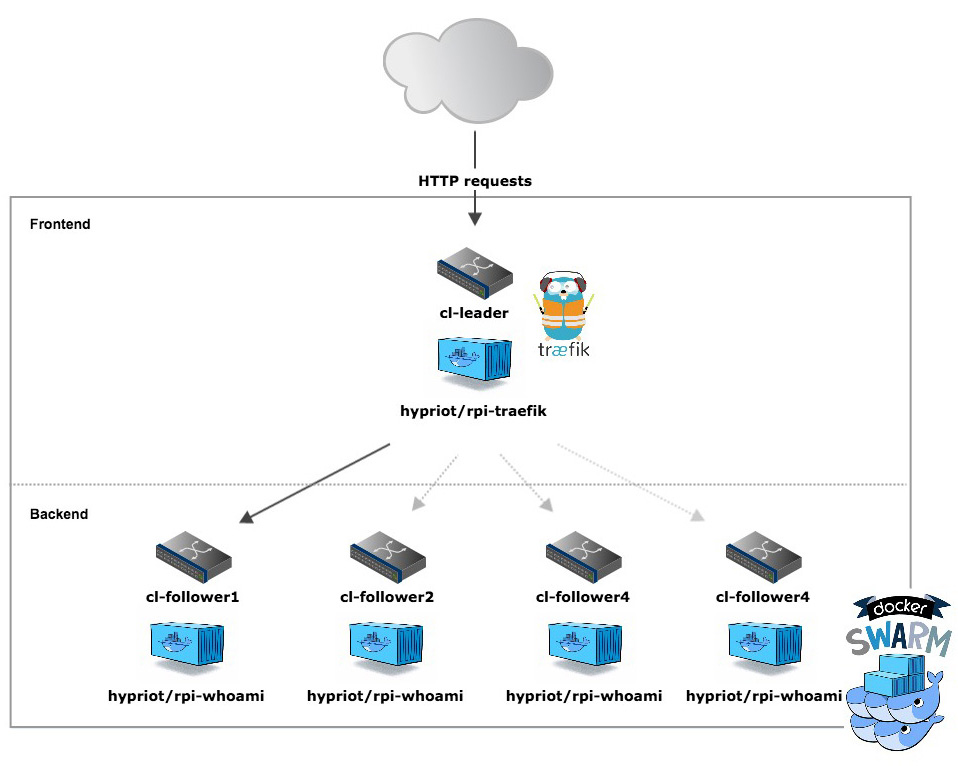
As you can see in the following architecture overview we will have a simple HTTP service that answers incoming HTTP requests.
We have multiple backend services that are running on different physical nodes for high availability and loadbalancing reasons. Traefik serves as a frontend proxy that loadbalances incoming requests to the available backend services.
Traefik as well as the backend services will run on top of a Docker Swarm cluster as containers. In this example each backend service will answer with their individual container ID to make it easy to see which one answered.

So to get started we need a running Docker Swarm Cluster first.
Creating a Docker Swarm Cluster
One of fastest and easiest ways to get a Docker Swarm cluster running is to use our Hypriot Cluster Lab.
As the Cluster Lab comes already preinstalled with out latest HypriotOS “Barbossa” release for the Raspberr Pi I will show you how to set up a Swarm Cluster with that.
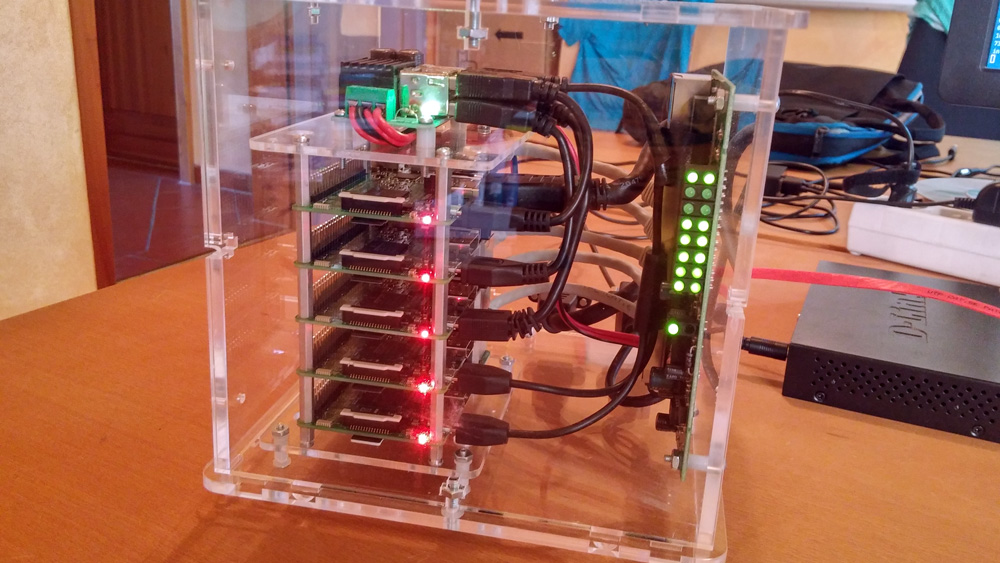
To follow along you will need at least three Raspberry Pi’s. I will use my Pico-Cluster with five nodes.

The first step is flashing the necessary SD card images with HypriotOS.
Clone the Hypriot flash repository and change into the appropriate folder for the operating system you are using to flash the SD cards.
$ git clone https://github.com/hypriot/flash.gi://github.com/hypriot/flash.git
$ cd flash/Darwin
With the flash tool ready we now can prepare the SD card for our leader node:
$ ./flash --hostname cl-leader https://github.com/hypriot/image-builder-rpi/releases/download/v0.8.0/hypriotos-rpi-v0.8.0.img.zip
Repeat the process for the follower nodes:
$ for i in {1..4} do; ./flash --hostname cl-follower${i} https://github.com/hypriot/image-builder-rpi/releases/download/v0.8.0/hypriotos-rpi-v0.8.0.img.zip; done
While the SD cards for the follower nodes are still being flashed you can already start the leader node.
SSH into the leader and become root user:
$ ssh [email protected]
$ sudo su
To make the Cluster Lab work with Traefik we need to update to the most recent version:
$ apt-get update
$ apt-get install hypriot-cluster-lab=0.2.13-1
Then start the Hypriot Cluster Lab with verbose output logging enabled:
$ VERBOSE=true cluster-lab start
While the Cluster Lab starts you can see how it configures itself and does a number of self-tests. If not all steps are green stop it and start it again. If that fails, too, have a look at our troubleshooting section.
After the leader node is ready, it is time to boot the rest of our nodes and update and start the Cluster Lab in the same fashion. So go ahead and come back when your are done.
Allright, We can now check if we really have a healthy five nodes Swarm Cluster by executing the following command:
DOCKER_HOST=tcp://192.168.200.1:2378 docker info | grep Nodes
Nodes: 5
And voila we now really have five nodes in our cluster. Congrats!
As you made it so far the rest will be a piece of a cake!
Setting up our microservice app with Traefik
Our example microservice application consists of two parts. The Traefik frontend and the WhoAmI application backend. For both parts I have prepared images for you that can be pulled from the Docker Hub.
The Traefik image is called hypriot/rpi-traefik and the WhoAmI image is called hypriot/rpi-whoami. The Dockerfiles for both images can be found on Github in the related repositories.
Because both Dockerfiles are a fine example of how easy it is to create Docker images for Golang based software I will show them here, too.
Dockerfile for “rpi-traefik”:
FROM hypriot/rpi-alpine-scratch
RUN apk update &&\
    apk upgrade &&\
    apk add ca-certificates &&\
    rm -rf /var/cache/apk/*
ADD https://github.com/containous/traefik/releases/download/v1.0.0-beta.771/traefik_linux-arm /traefik
RUN chmod +x /traefik
EXPOSE 80 8080
ENTRYPOINT ["/traefik"]
Here we just add the Traefik binary on top of an Alpine linux image. The result is an image that is already quite small with about 41 MB. It propably could be made even smaller by ensuring that the Traefik binary is compiled as a static binary and then putting it into an empty scratch image.
You can see how this can be done with the next Dockerfile for the WhoAmI image:
Dockerfile for “rpi-whoami”:
FROM scratch

ADD http /http

ENV PORT 8000
EXPOSE 8000

CMD ["/http"]
With about 3 MB the resulting image is really small.
Well, now it is time to put this all together in a Docker Compose application.
Clone the following repository on you cluster leader:
$ git clone https://github.com/hypriot/rpi-cluster-lab-demos
When the cloning is finished change into the ‘traefik’ folder and use Docker Compose to start our application on top of our little Docker Swarm cluster:
$ cd rpi-cluster-lab-demos/traefik
$ DOCKER_HOST=tcp://192.168.200.1:2378 docker-compose up -d
Creating network "traefik_default" with the default driver
Creating traefik_traefik_1
Creating traefik_whoami_1
With this command Docker Compose should start two containers. One Traefik container on our leader and one WhoAmi container on one of our follower nodes.
Let’s check if that really happened:
$ DOCKER_HOST=tcp://192.168.200.1:2378 docker ps | grep 'traefik\|whoami'
cba8d9a7d8f7        hypriot/rpi-whoami         "/http"                  About a minute ago   Up About a minute   8000/tcp                                                 cl-follower1/traefik_whoami_1
7dc2b48a24e2        hypriot/rpi-traefik        "/traefik --web --doc"   About a minute ago   Up About a minute   192.168.200.1:80->80/tcp, 192.168.200.1:8080->8080/tcp   cl-leader/traefik_traefik_1
Looks good. So let’s test our application by flinging some HTTP request towards our frontend:
$ for i in {1..5}; do curl -H Host:whoami.docker.localhost http://192.168.200.1; done
I'am f72892c9187c
I'am f72892c9187c
I'am f72892c9187c
I'am f72892c9187c
I'am f72892c9187c
As you can see it is always the same backend container which is responding and that’s just as it should be.
Next we are going to increase the number of backend containers with the help of Docker Compose scale command.
$ DOCKER_HOST=tcp://192.168.200.1:2378 docker-compose scale whoami=5
Creating and starting traefik_whoami_2 ... done
Creating and starting traefik_whoami_3 ... done
Creating and starting traefik_whoami_4 ... done
Creating and starting traefik_whoami_5 ... done
We can watch as Docker Compose tells Docker Swarm to spin up more containers.
Let’s verify again if we now have five backend containers running:
$ for i in {1..5}; do curl -H Host:whoami.docker.localhost http://192.168.200.1; done
I'm 5d829fecbdaa
I'm 5eb115353885
I'm e0313ac24554
I'm 642b5d2c8d09
I'm f72892c9187c
Perfect. Obviously Traefik did recognise that we started more containers and made them available to the frontend automatically.
We can see what happened by looking at the logs of the Traefik container:
$ DOCKER_HOST=tcp://192.168.200.1:2378 docker-compose logs traefik
...
traefik_1  | time="2016-06-07T06:50:38Z" level=debug msg="Configuration received from provider docker: {\"backends\":{\"backend-whoami\":{\"servers\":{\"server-traefik_whoami_1\":{\"url\":\"http://10.0.0.3:8000\",\"weight\":1},\"server-traefik_whoami_2\":{\"url\":\"http://10.0.0.5:8000\",\"weight\":1},\"server-traefik_whoami_3\":{\"url\":\"http://10.0.0.6:8000\",\"weight\":1},\"server-traefik_whoami_4\":{\"url\":\"http://10.0.0.4:8000\",\"weight\":1},\"server-traefik_whoami_5\":{\"url\":\"http://10.0.0.7:8000\",\"weight\":1}}}},\"frontends\":{\"frontend-Host-whoami-docker-localhost\":{\"backend\":\"backend-whoami\",\"routes\":{\"route-frontend-Host-whoami-docker-localhost\":{\"rule\":\"Host:whoami.docker.localhost\"}},\"passHostHeader\":true}}}"
traefik_1  | time="2016-06-07T06:50:38Z" level=debug msg="Last docker config received less than 2s, waiting..."
traefik_1  | time="2016-06-07T06:50:40Z" level=debug msg="Waited for docker config, OK"
traefik_1  | time="2016-06-07T06:50:40Z" level=debug msg="Creating frontend frontend-Host-whoami-docker-localhost"
traefik_1  | time="2016-06-07T06:50:40Z" level=debug msg="Wiring frontend frontend-Host-whoami-docker-localhost to entryPoint http"
traefik_1  | time="2016-06-07T06:50:40Z" level=debug msg="Creating route route-frontend-Host-whoami-docker-localhost Host:whoami.docker.localhost"
traefik_1  | time="2016-06-07T06:50:40Z" level=debug msg="Creating backend backend-whoami"
traefik_1  | time="2016-06-07T06:50:40Z" level=debug msg="Creating load-balancer wrr"
traefik_1  | time="2016-06-07T06:50:40Z" level=debug msg="Creating server server-traefik_whoami_4 at http://10.0.0.4:8000 with weight 1"
traefik_1  | time="2016-06-07T06:50:40Z" level=debug msg="Creating server server-traefik_whoami_3 at http://10.0.0.6:8000 with weight 1"
traefik_1  | time="2016-06-07T06:50:40Z" level=debug msg="Creating server server-traefik_whoami_2 at http://10.0.0.5:8000 with weight 1"
traefik_1  | time="2016-06-07T06:50:40Z" level=debug msg="Creating server server-traefik_whoami_1 at http://10.0.0.3:8000 with weight 1"
traefik_1  | time="2016-06-07T06:50:40Z" level=debug msg="Creating server server-traefik_whoami_5 at http://10.0.0.7:8000 with weight 1"
traefik_1  | time="2016-06-07T06:50:40Z" level=info msg="Server configuration reloaded on :80"
Looking at the logs we can now clearly see how Traefik catched the Docker event and how it reacted.
Isnt’ awesome?
OK. So this was basically our quick tour on how to do set up a simple microservice example with Docker and Traefik.
The only thing that is left for us now is to clean up again.
$ DOCKER_HOST=tcp://192.168.200.1:2378 docker-compose down -v
Did you notice the ‘-v’ option? This seems to be really important as it cleans up all the containers including the overlay network that was created for us. Without the ‘-v’ option we would get an error the next time we start the application again with Docker Compose.
It is also a good idea to stop the Cluster Lab on all nodes before you switch of your Raspberry Pi’s.
So do a
$ cluster-lab stop
on all your cluster nodes.
It’s just amazing how many interesting technologies we used in this small blog post. And it wasn’t to hard to get them running together, wasn’t it?
That is mostly due to the work the Hypriot Cluster Lab does for us and of course under the hood it is the Docker-Engine, Docker-Swarm and Docker-Compose that let’s us do so much with so little effort.
So make sure to give our Hypriot Cluster Lab a spin and try some of the examples in our Hypriot Cluster Lab Demos repository or add some of your own. Pull requests are always welcome.
As always use the comments below to give us feedback and share the news about this release on Twitter, Facebook or Google+.
Govinda @_beagile__
comments powered by Disqus
 Edit this blog on GitHub