This guide shows you how to get Docker running on your Raspberry Pi using a Linux workstation.
If you have not read the getting started guide about Docker on the Raspberry Pi yet you might wanna check it out first: Getting started on your ARM device
We tried to make this guide as concise as possible. Make sure that you know the basics about the command line and you should be ready to go. If you don’t you can learn the basics in An Introduction to the Linux Terminal and come back afterwards.
The hardware you gonna need to follow along is a Raspberry Pi 1 or 2 and one SD card.
If you are going to use a Raspberry 2 you will have to use a microSD card - otherwise a normal SD card is sufficient.
We recommend a size of at least 4 GB.
The SD card contains all the software which we are going to use on our Raspberry Pi.
With software we basically mean two things: first an operating system for your Raspberry Pi and second the software you as user would like to use - e.g. a browser or a word processing program.
In our case the software we wanna use is Docker.
We - from Hypriot - created a preconfigured SD card image which contains everything you need to run Docker on your Raspberry Pi. To use the image you first have to download and transfer it to your SD card. Transferring an image to an SD card is often referred to as flashing. Afterwards you just have to insert the flashed SD card into your Raspberry Pi and start it up.
Download our latest SD card image from the download page.
After the download is completed open a terminal window. To do this use the search function of your Linux distribution and type terminal and press Enter.
Now we will extract the downloaded zip file. Go to your Download folder first by typing
cd ~/Downloads
Extract the zip file with
unzip hypriot-rpi-201???.img.zip
After the file is unzipped you will have a new file with an .img extension. In the next step we will flash this file onto your SD card.
First put your SD card into the computer. Then in the terminal type
lsblk
You should see a list of all your disks like this:
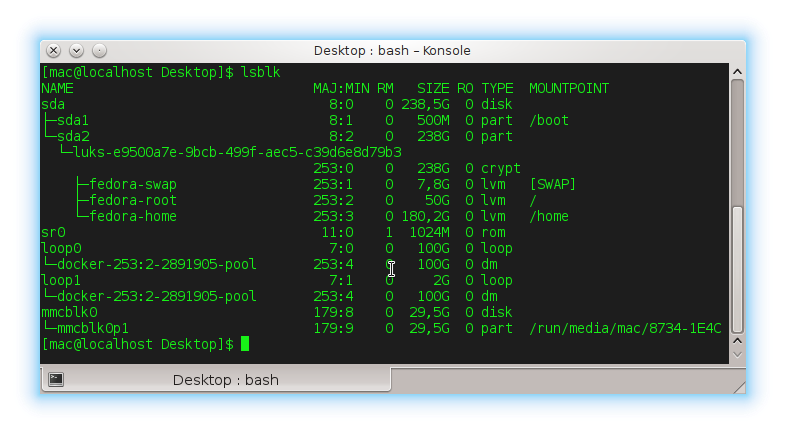
Now identify the SD Card. Look at the fourth column which shows the size of the devices of your workstation.
One item in the list should have a size that is very close to the size of your SD card.
From there get the identifier which is shown in the first column.
In this case the identifier is mmcblk0 and 29,5G refers to a 32 GB sized SD card.
Next you need to make sure that the partitions of the SD card are not mounted. Check the column MOUNTPOINT – if you have any entries in the row of your SD card you need to unmount them. If not you can skip the unmount command.
As you can see in the last screenshot we have to unmount one partition.
Copy and paste the path you see in your own MOUNTPOINT column behind the unmount command.
umount /run/media/mac/8734-1E4C
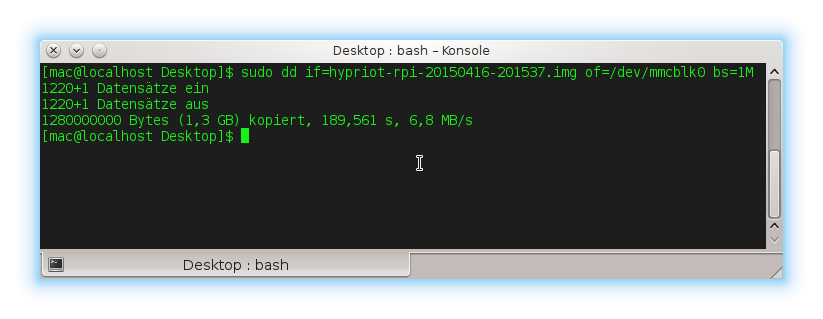
Now we are ready to flash the SD card. We are going to use the dd command for this.
Before we start make sure you
if=hypriot-rpi... with the path to the downloaded imageof=/dev/mmcblk0 with the identifier of your SD cardsudo dd if=hypriot-rpi-201???.img of=/dev/mmcblk0 bs=1M
While this command is executed you won’t get any information about its progress. Depending on your hardware and the performance of your SD card it will take up to five minutes to flash the image.
When dd is finished you should get an output like this:
Finally unmount the SD card again in the same way as before.
Boot your Raspberry Pi by
After finishing the last step your Raspberry Pi will boot and the LEDs should start blinking. The very first boot will take one to three minutes as the file system will be resized.
To check if Docker is actually running we need to log into the Raspberry Pi.
To do this we need to find out the IP address of your Raspberry Pi first.
If you are not sure what the IP-Address of your PI is, there are different ways of finding it out.
One way is to use the tool nmap which you might need to install first.
Depending on the Linux distribution you are using you need one of the following commands to install nmap.
apt-get install nmap   # for debian based distros
yum install nmap       # for red hat based distros
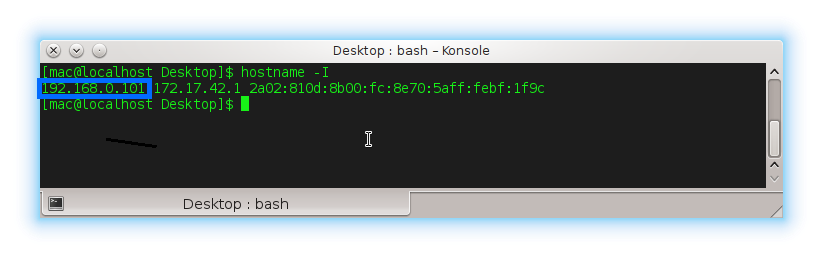
First identify the IP address of your own workstation. Type
hostname -I
As you can see in the following screenshot our IP address is 192.168.0.101.
Then replace the IP address in front of the /24 with yours and type
nmap -sP 192.168.0.101/24 | grep black-pearl
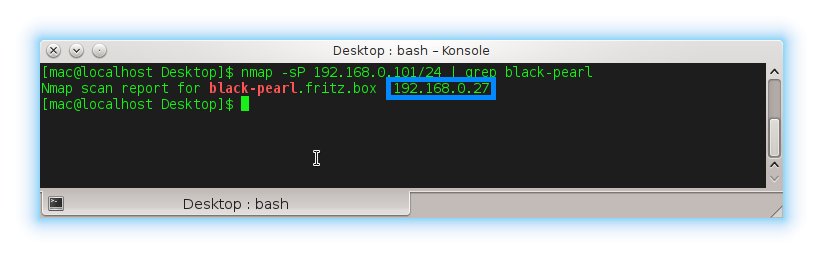
The output of the nmap command should show you the IP address of your Raspberry Pi.
If you get a blank line without an IP address your Raspberry Pi is probably not connected to the network.
Or there is a problem with the SD card which prevents the Raspberry Pi from booting.
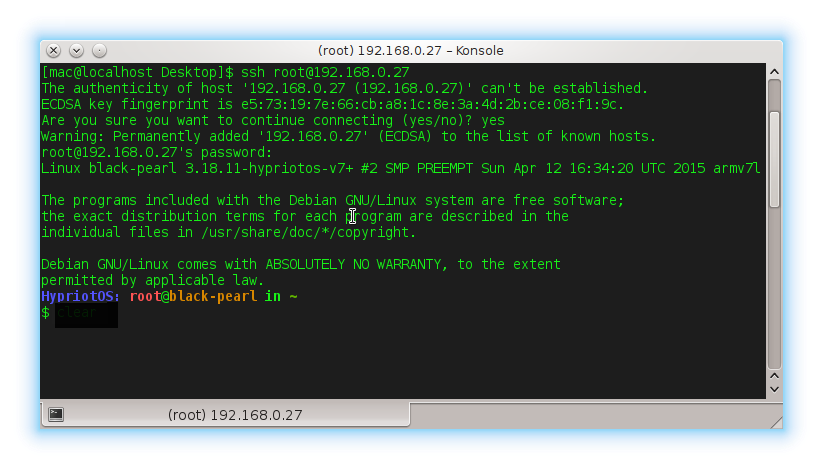
After you found out the IP address establish a connection to the Raspberry Pi with the ssh command.
Replace the IP address after the @ with the one of your Raspberry Pi.
ssh [email protected]
When you are asked for the password type hypriot and hit Enter.
The first time you establish the connection you will be asked if you are sure that you want to connect to the Raspberry Pi - answer with yes.
If everything went fine you should now see the HypriotOS command line prompt waiting for your input.
Finally check if the Docker service is running by typing
docker info
The output of the docker info command should look similar to:

Congratulations! You have succeeded in getting Docker running on your Raspberry Pi! :)
You are now ready to continue your exploration of Docker with our Getting Started Guide.
Have fun!
comments powered by Disqus