How to use Docker Compose to run complex multi container apps on your Raspberry Pi
Mon, Apr 6, 2015In this blog post we gonna walk you through the different steps that are necessary to get you started with Docker Compose and show how to use it.
To demonstrate the benefits of Docker Compose we are going to create a simple Node.js “Hello World” application which will run on three Docker Node.js containers. HTTP requests will be distributed to these Node.js nodes by an HAProxy instance running on another Docker container.
If you haven’t heard about Docker Compose its docs have a neat description of what it is all about:
Compose is a tool for defining and running complex applications with Docker. With Compose, you define a multi-container application in a single file, then spin your application up in a single command which does everything that needs to be done to get it running.
A Hello-World application
We start by creating a simple Hello-World Node.js web application based on Express.js.
To keep it simple we are only going to show a “Hello World” message and the hostname of the container. This will be useful later on.
src/index.js
First we create a src/index.js file for the web application:
var express = require('express');
var os = require("os");

var app = express();
var hostname = os.hostname();

app.get('/', function (req, res) {
  res.send('<html><body>Hello from Node.js container ' + hostname + '</body></html>');
});

app.listen(80);
console.log('Running on http://localhost');
src/package.json
Then we need to create a src/package.json file with the dependencies we need to build and start the Node.js application:
{
  "name": "node-hello-world",
  "private": true,
  "version": "0.0.1",
  "description": "Node.js Hello world app on docker",
  "author": "hypriot.com",
  "dependencies": {
    "express": "4.12.0"
  }
}
And that is all that is need to set up this small Hello-World application from the nods.js side of things.
Dockerfile
As we want to run our web application in a Docker container we now need to create a Dockerfile for that.
The Dockerfile is simple and straightforward.
# use our prepared Raspberry Pi compatible Docker base image with Node.js
FROM hypriot/rpi-node:0.12.0

# make the src folder available in the docker image
ADD src/ /src
WORKDIR /src

# install the dependencies from the package.json file
RUN npm install

# make port 80 available outside of the image
EXPOSE 80

# start node with the index.js file of our hello-world application
CMD ["node", "index.js"]
Running one container
We can now test if our Node.js web server works by building a Docker application image first and then spinning it up as a new container.
$ docker build -t node-hello .

$ docker run -p 80:80 --name web -d node-hello
Then we can check if the server is running with the following command
$ curl http://localhost
<html><body>Hello from Node.js container 38f69acbdf13</body></html>
As we have published the port 80 to the host we also can access our web application from another machine.
Benchmarking our web application
As we are curious guys we want to know how well our Hello-World application performs on a Docker-Raspberry-Pi-Combo.
So we are going to use Apache Bench to do some benchmarking from another machine in the network.
To install Apache Bench on Debian/Ubuntu use sudo apt-get install apache2-utils. On Mac OS X ab usually comes preinstalled.
$ ab -n 10000 -c 10 http://ip-of-your-rpi/
This runs 10.000 HTTP requests with a concurrency of 10. The CPU load while running the benchmark test shows that only one CPU core of the Raspberry Pi 2 is used. The reason is that Node.js is a single threaded process.
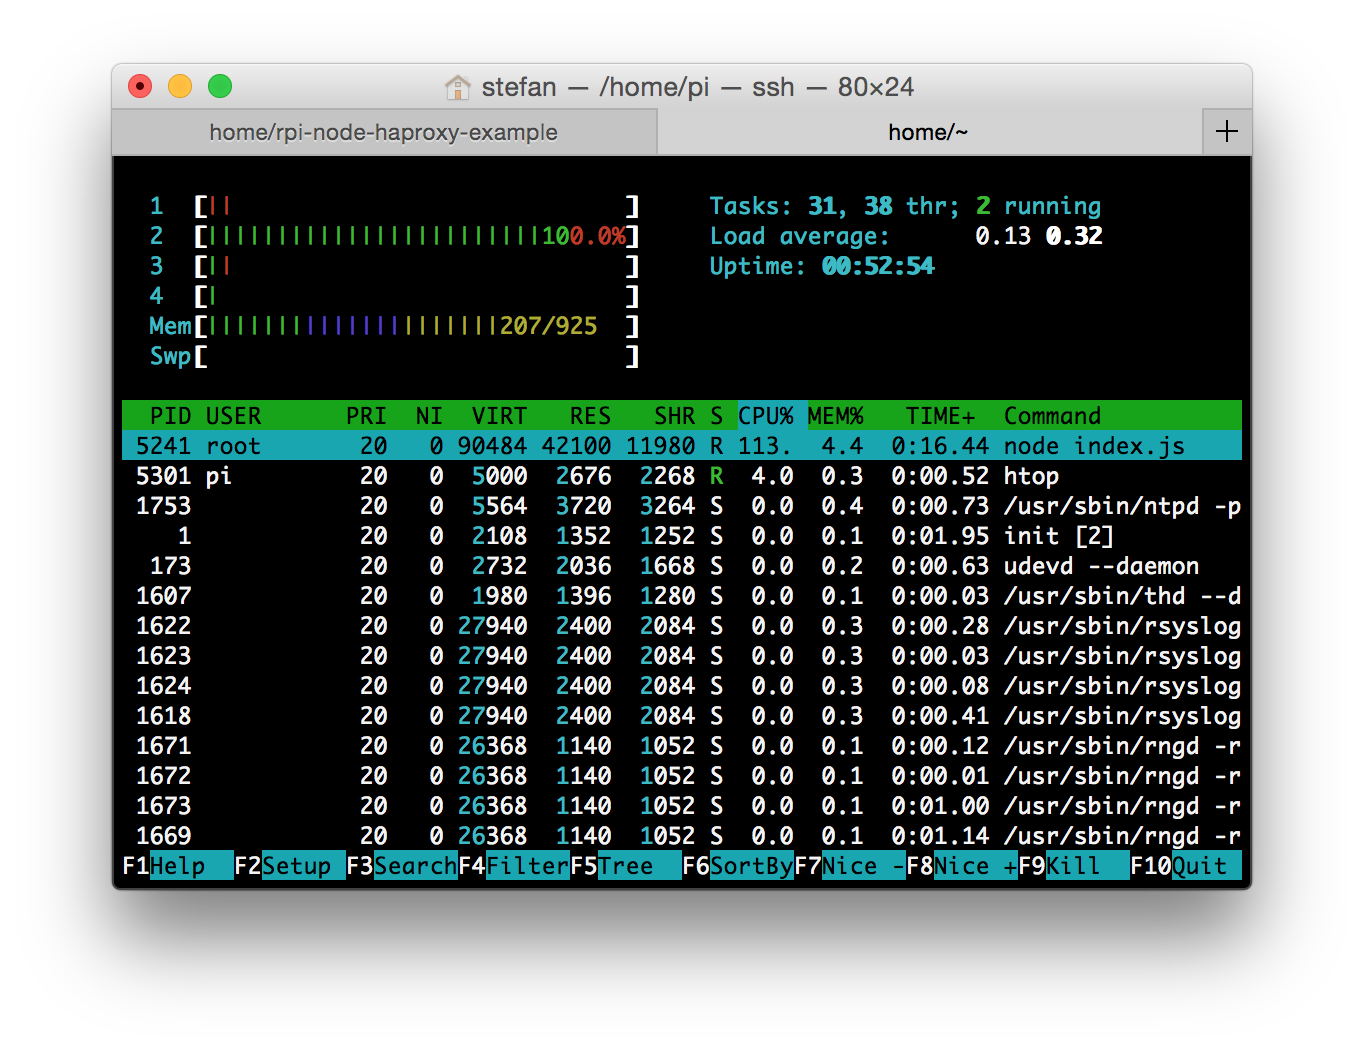
And here are the results of the Apache Bench test. As you can see a single web server can handle 338 Requests per second.
$ ab -n 10000 -c 10 http://192.168.33.200/
This is ApacheBench, Version 2.3 <$Revision: 655654 $>
Copyright 1996 Adam Twiss, Zeus Technology Ltd, http://www.zeustech.net/
Licensed to The Apache Software Foundation, http://www.apache.org/

Benchmarking 192.168.33.200 (be patient)
Completed 1000 requests
Completed 2000 requests
Completed 3000 requests
Completed 4000 requests
Completed 5000 requests
Completed 6000 requests
Completed 7000 requests
Completed 8000 requests
Completed 9000 requests
Completed 10000 requests
Finished 10000 requests


Server Software:
Server Hostname:        192.168.33.200
Server Port:            80

Document Path:          /
Document Length:        67 bytes

Concurrency Level:      10
Time taken for tests:   29.499 seconds
Complete requests:      10000
Failed requests:        0
Write errors:           0
Total transferred:      2480000 bytes
HTML transferred:       670000 bytes
Requests per second:    338.99 [#/sec] (mean)
Time per request:       29.499 [ms] (mean)
Time per request:       2.950 [ms] (mean, across all concurrent requests)
Transfer rate:          82.10 [Kbytes/sec] received

Connection Times (ms)
              min  mean[+/-sd] median   max
Connect:        1    1   2.0      1      78
Processing:    10   28   5.6     26     108
Waiting:        9   28   5.4     26     106
Total:         13   29   5.8     27     109

Percentage of the requests served within a certain time (ms)
  50%     27
  66%     27
  75%     28
  80%     28
  90%     38
  95%     39
  98%     47
  99%     53
 100%    109 (longest request)
Cleaning up
That’s it for our first test drive. We can now stop the web server container.
$ docker stop web
Running multiple container with Docker Compose
To run more of these web servers we now use Docker Compose to create a farm of web servers which are running behind a HAProxy load balancer.
As our mission is to make Docker and its toolset available on ARM we created a docker-compose binary ready to run on your Raspberry Pi.
Installation
First we have to install Docker Compose for the ARM-based Raspberry Pi from our fork at https://github.com/hypriot/compose.
$ sudo sh -c "curl -L https://github.com/hypriot/compose/releases/download/1.1.0-raspbian/docker-compose-`uname -s`-`uname -m` > /usr/local/bin/docker-compose; chmod +x /usr/local/bin/docker-compose"
docker-compose.yml
To get our four container configuration set up we first need to create a docker-compose.yml file.
We will need three containers weba, webb and webc based on our web application image and one haproxy container.
weba:
  build: .
  expose:
    - 80

webb:
  build: .
  expose:
    - 80

webc:
  build: .
  expose:
    - 80

haproxy:
  image: hypriot/rpi-haproxy
  volumes:
   - haproxy:/haproxy-override
  links:
   - weba
   - webb
   - webc
  ports:
   - "80:80"
   - "70:70"

  expose:
   - "80"
   - "70"
Each of the three web application containers exposes port 80. Additionally the HAProxy container will have (network) links to each of the three web application containers. Furthermore the HAProxy container will exposes port 80 as a central entry point to our Hello-World application webserver farm and its admin interface on port 70.
haproxy/haproxy.cfg
HAProxy needs a configuration file that is mapped into the container. Create a file haproxy/haproxy.cfg with the following content.
global
  log 127.0.0.1 local0
  log 127.0.0.1 local1 notice

defaults
  log global
  mode http
  option httplog
  option dontlognull
  timeout connect 5000
  timeout client 10000
  timeout server 10000

listen stats :70
  stats enable
  stats uri /

frontend balancer
  bind 0.0.0.0:80
  mode http
  default_backend aj_backends

backend aj_backends
  mode http
  option forwardfor
  # http-request set-header X-Forwarded-Port %[dst_port]
  balance roundrobin
  server weba weba:80 check
  server webb webb:80 check
  server webc webc:80 check
  # option httpchk OPTIONS * HTTP/1.1\r\nHost:\ localhost
  option httpchk GET /
  http-check expect status 200
HAProxy does a health check for each of our three web servers.
Running our webserver farm
Now that we have set up all the necessary parts it is time to spin up all our Docker containers at once. Just run the command docker-compose up interactively to see what is happening or use option -d to start all containers in the background.
$ docker-compose up -d
Recreating rpinodehaproxyexample_webb_1...
Recreating rpinodehaproxyexample_webc_1...
Recreating rpinodehaproxyexample_weba_1...
Recreating rpinodehaproxyexample_haproxy_1...
This will spin up all of our three web application servers and one HAProxy instance. Only the HAProxy container can be reached from the outside and each request will be load balanced by HAProxy to one of our web servers.
You can watch the logs of all our containers by running the following command.
$ docker-compose logs
Attaching to rpinodehaproxyexample_haproxy_1, rpinodehaproxyexample_weba_1, rpinodehaproxyexample_webc_1, rpinodehaproxyexample_webb_1
weba_1    | Running on http://localhost
webc_1    | Running on http://localhost
webb_1    | Running on http://localhost
Now we can use curl again to test our Hello-World application farm as whole.
# on your Raspberry Pi
$ curl http://localhost
<html><body>Hello from Node.js container fa05496d9ce7</body></html>~
$ curl http://localhost
<html><body>Hello from Node.js container 1167459cdacc</body></html>~
$ curl http://localhost
<html><body>Hello from Node.js container 660840416a84</body></html>~
$ curl http://localhost
<html><body>Hello from Node.js container fa05496d9ce7</body></html>~
As you can see the container name is different for each curl request.
And the fourth request has the same container name as the first one.
The HAProxy container forwards each request in a round robin fashion, so each web server gets only one third of the load.
Benchmarking our web application farm
Let’s see how our web server farm fares compared to our single web application container instance from our first benchmark.
$ ab -n 10000 -c 30 http://ip-or-your-rpi/
Now we run 10.000 HTTP requests with a concurrency of 30. The CPU load while running the benchmark test now shows that all four CPU cores of the Raspberry Pi 2 are used.
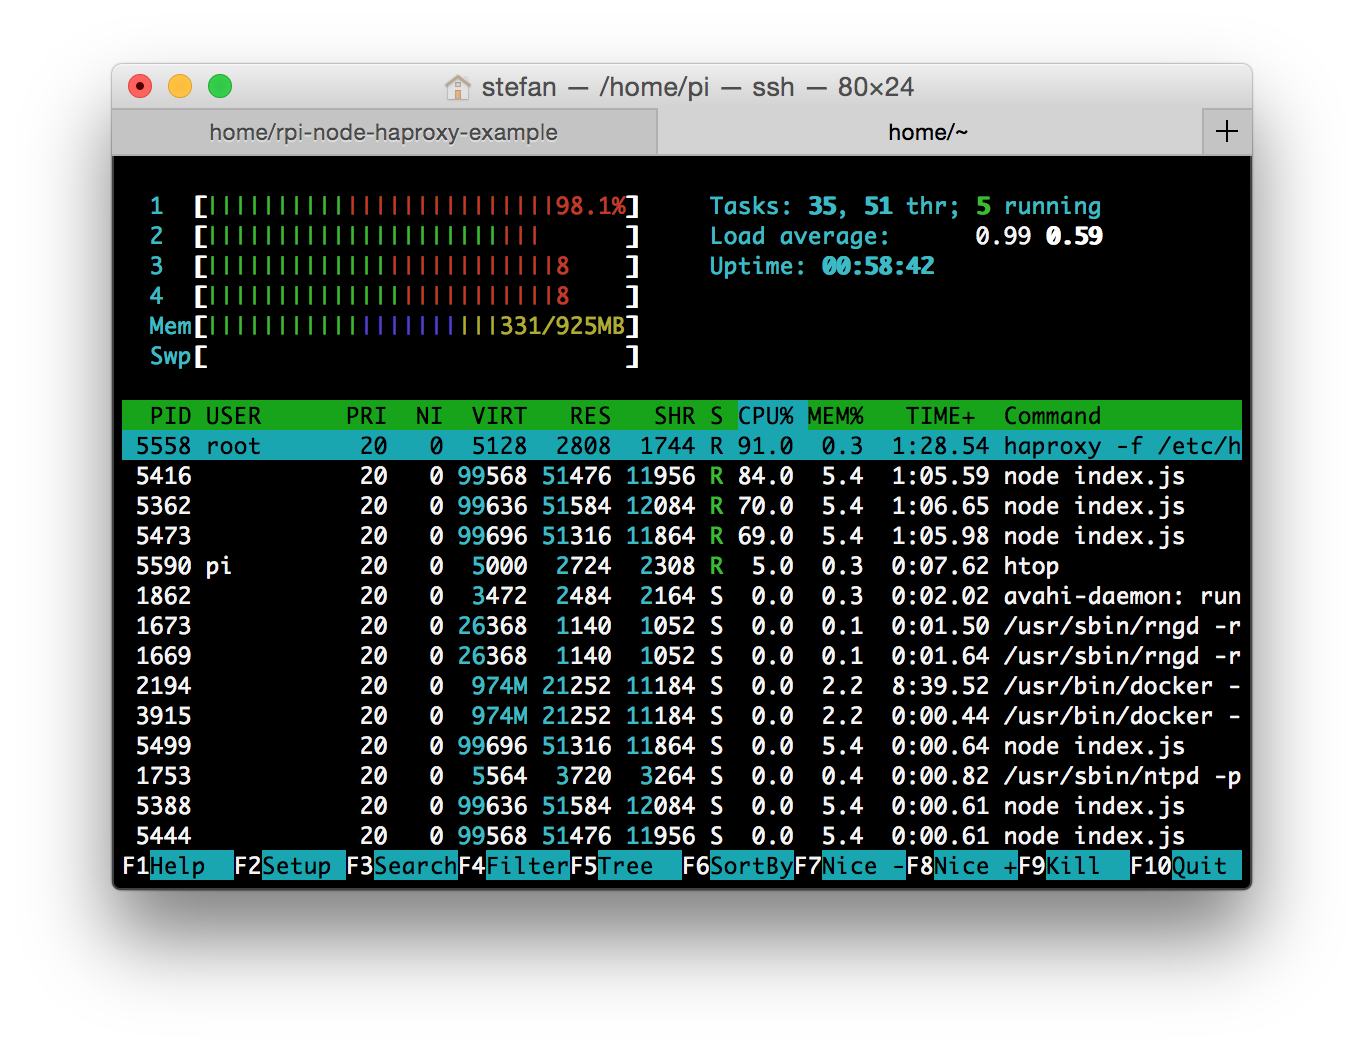
And here are the results of the benchmark test itself.
$ ab -n 10000 -c 30 http://192.168.33.200/
This is ApacheBench, Version 2.3 <$Revision: 655654 $>
Copyright 1996 Adam Twiss, Zeus Technology Ltd, http://www.zeustech.net/
Licensed to The Apache Software Foundation, http://www.apache.org/

Benchmarking 192.168.33.200 (be patient)
Completed 1000 requests
Completed 2000 requests
Completed 3000 requests
Completed 4000 requests
Completed 5000 requests
Completed 6000 requests
Completed 7000 requests
Completed 8000 requests
Completed 9000 requests
Completed 10000 requests
Finished 10000 requests


Server Software:
Server Hostname:        192.168.33.200
Server Port:            80

Document Path:          /
Document Length:        67 bytes

Concurrency Level:      30
Time taken for tests:   23.353 seconds
Complete requests:      10000
Failed requests:        0
Write errors:           0
Total transferred:      2480000 bytes
HTML transferred:       670000 bytes
Requests per second:    428.22 [#/sec] (mean)
Time per request:       70.058 [ms] (mean)
Time per request:       2.335 [ms] (mean, across all concurrent requests)
Transfer rate:          103.71 [Kbytes/sec] received

Connection Times (ms)
              min  mean[+/-sd] median   max
Connect:        1    2   1.4      2      15
Processing:     5   68  59.5     51     259
Waiting:        4   67  59.3     51     259
Total:          5   70  59.5     54     260

Percentage of the requests served within a certain time (ms)
  50%     54
  66%     77
  75%     94
  80%    108
  90%    163
  95%    210
  98%    231
  99%    234
 100%    260 (longest request)
As you can see the cluster can handle 428 Requests per second. Strangely enough we do not get three times the requests per second that we might have expected. Right now we are not really sure what the reason for this behaviour is. This may or may not be due to the fact that the NIC of the Raspberry Pi is sharing its IO bandwidth via the USB2 port.
Stopping our little webfarm is also easily done with
$ docker-compose stop
Killing rpinodehaproxyexample_haproxy_1...
Killing rpinodehaproxyexample_weba_1...
Killing rpinodehaproxyexample_webc_1...
Killing rpinodehaproxyexample_webb_1...
If you want to learn more about Docker Compose, just head over to the official documentation at https://docs.docker.com/compose/.
You can find the code of this example on GitHub at https://github.com/hypriot/rpi-node-haproxy-example.
We hope you enjoyed this little tour of Docker Compose!
As always use the comments below to give us feedback and share it on our HackerNews-Thread, Twitter or Facebook.
comments powered by Disqus